
How to create a certificate of insurance
To begin place your mouse on the shipments menu on the top menu bar, and in the drop down select Certificates.

Selecting the Certificates menu will open the shipment detailed information screen. This screen is used to capture all the details of a specific shipment and will produce a certificate of that shipment.
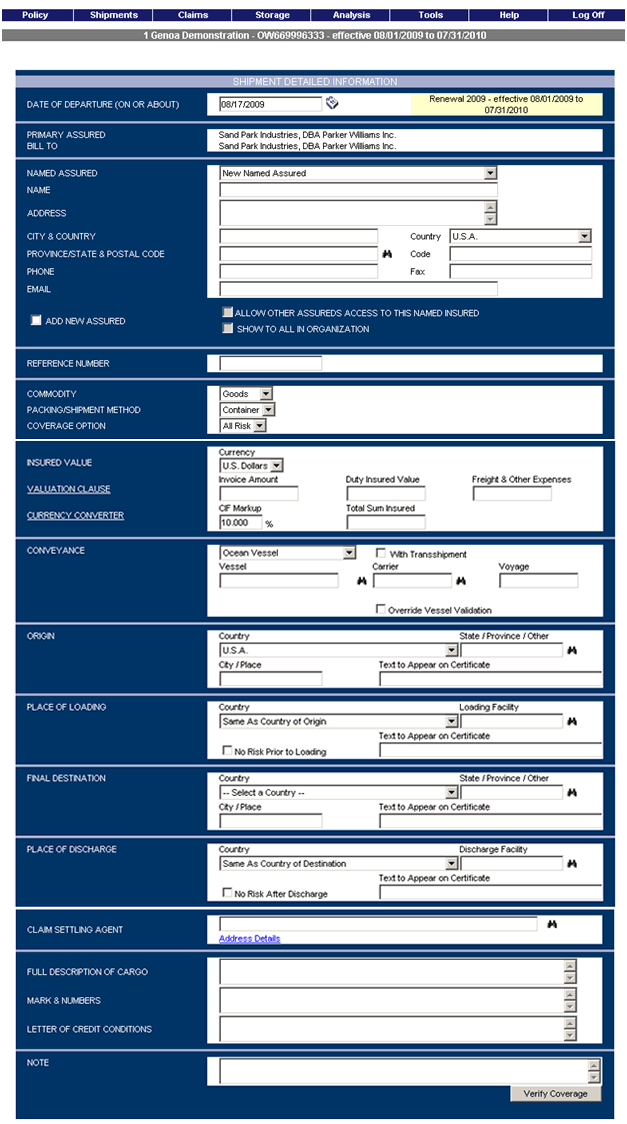
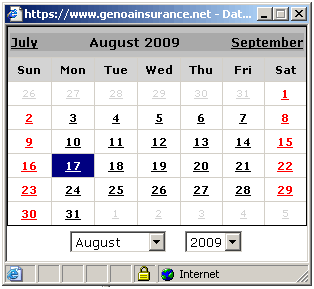
Date of Departure: The first field is the Date of Departure field. The date of departure could be the bill of lading date, the date from the letter of credit or the date when the vessel sails or the plane takes off depending on the details of your shipment. The field defaults with the current date, however it can be changed either by typing in the correct date or by clicking on the calendar lookup next to the field. The lookup opens a calendar from where you can choose the correct date.

Primary Assured/Bill To: The next section displays the Primary Assured and Bill To parties. If there is only one option defined in the insurance policy then nothing needs to be done in this section. If there are more options, a dropdown will be displayed and you can choose the correct one.

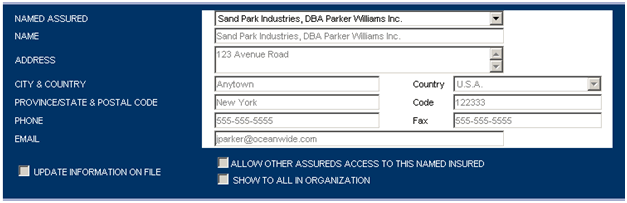
Named Assured: The Named Assured is the company to appear on the certificate and will have a right to make a claim against this shipment in case of loss or damage.
To enter named assured information start by opening the dropdown menu. From the list you can choose the correct information that applies to your shipment. Once you select one from the list the screen will refresh and pull in the information about that named assured.
New Named Assured: If however, you cant find the information you need in this case you can also use the New Named assured option. Select that option from the dropdown list and type in the information yourself.
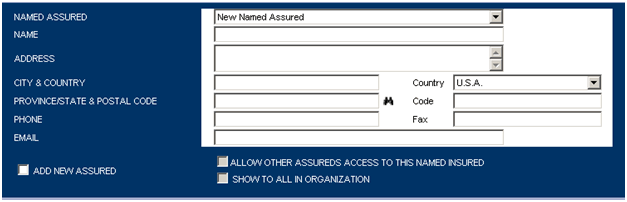
Once you have typed in the information, you can also save it for later use. Check the first checkbox to save it for yourself, check the second checkbox to share it with other users in your company or the third one to share the information with everyone who has access to this policy.

Reference Number: The Reference Number field will not be displayed on the standard certificate, but you can use it to add reference numbers or other identifying information about this shipment or it can be used to name a template.

Commodity: Select the commodity from the dropdown list. When you do this the screen will refresh the following two dropdowns to correspond to the commodity you selected.
Once the screen has refreshed you can pick the packing and shipment method as well as the coverage option from the menu.

Insured Value: To enter the insured value you need to first pick the currency. The list will display all the currencies that are allowed within your policy.
Invoice Amount: Then enter the invoice amount. Once you click outside of the invoice amount field the Total Sum Insured field automatically updates if the policy has a CIF markup defined.
The Duty Insured Value and Freight & Other Expenses fields work the same way and the sums are added to the Total Sum Insured.

Conveyance: Pick a conveyance from the dropdown list.
Vessel: Once you have picked one, you can enter the name of the Vessel into the next field. If your conveyance is ocean vessel, you can start typing the name of the vessel and a dropdown list appears with all those vessels listed that match what you started typing.
- You can also open the entire list from the binocular lookup. When you pick a vessel from the list, the carrier name will also be filled out.
Voyage: If you have a voyage number associated with your shipment, you can enter it in the appropriate field.

Voyage Information: Next you need to enter the voyage information
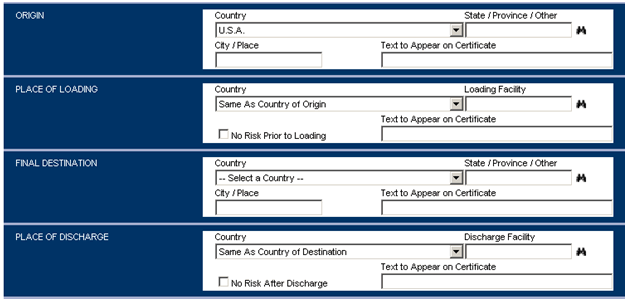
Country of Origin: Start by choosing a Country of Origin from the dropdown list.
- Once you've picked the Country of Origin, the State/Province/Other lookup will display the states or provinces in that country. You can either start typing the name or open the list by clicking on the binocular lookup.
- Finally, type in the City/Place.

Place of Loading: In the Place of Loading section, you can either leave in Same As Country of Origin or change the country by selecting the correct one from the dropdown list.
Loading Facility: Enter the Loading Facility. Either start typing in the place or pick one from the binocular lookup.
- The places of loading will show ocean ports when your conveyance is ocean vessel, airports when your conveyance is air and when you use either truck or rail; you can just type in the place of loading.
If No Risk Prior to Loading applies to your shipment, you can indicate it by checking the checkbox.

Final Destination/Place of Discharge: The Final Destination and Place of Discharge sections work exactly the same way as Country of Origin and Place of Loading.


Claim Settling Agent: To enter a Claim Settling Agent, click on the binocular lookup to choose an agent from a preapproved list.

Full Description of Cargo: Full Description of Cargo is a free type field. The field will grow to accommodate the text you enter.
Marks & Numbers/Letter of Credit Conditions: The Marks & Numbers field and Letter of Credit Conditions will also grow to accommodate the text you enter and will be displayed on the certificate.

Note: The Note field allows you to add additional information that will not be printed on the certificate.

Verify Coverage: Once you have entered the details click on Verify Coverage. This will compare the details entered in the shipment form to your policy. If the shipment falls within the scope of the policy, premium information will appear at the top of the screen.

If you didnt fill out a mandatory field, you will get a message at the top of the screen indicating which field(s) needs to be filled out. After completing the required field(s), you can verify coverage again.
Referral: If this shipment is not covered by your policy, you will see a referral message. To proceed with the referral and have it sent to your insurance representative for processing, you will need to confirm the referral by selecting the Confirm Referral button at the bottom of the screen.


Override Vessel Validation Checkbox: If for any reason the carrier name is incorrect for example, in a letter of credit shipment, you can trigger a referral by checking the Override Vessel Validation checkbox. This will allow you to modify the carrier name but the modification will need to be reviewed by your Insurance Representatives. To learn more about the referrals, please see the learning center video "what is a referral".

Save Template: If the certificate contains similar information to ones you will be completing in the future you can save it as a template. It will be saved in the system with the reference number entered earlier in the shipment form.
Print Draft: You can preview the certificate by printing a draft of your shipment. If your shipment is covered by your policy and youre satisfied with the details entered, you can then confirm booking.

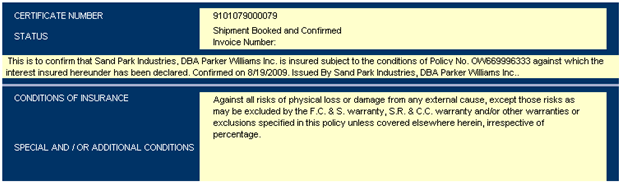
Confirm Booking: Once you select Confirm Booking, the shipment will be saved with a certificate number and you will be able to print the certificate.
Print Certificate: To print the certificate, go to the bottom of the screen and select the Print Certificate option. This will generate a PDF file with your original certificate. The original certificate is created only the first time you click on the Print Certificate button. After that, you can only create a copy of the certificate.
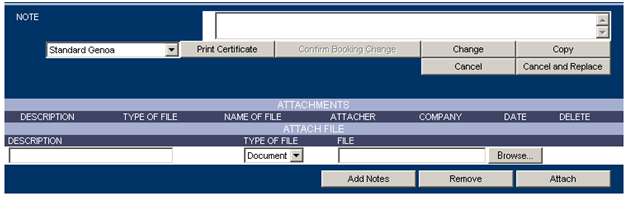
Attach File: You can attach files to the shipments record, such as pictures of the cargo or packing lists. To do this, enter a Description, pick what Type of File it is and attach the file as you would attach one to an e-mail.
